Magnetic Gun
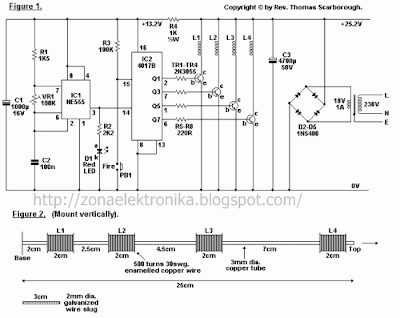
Picured in Figure 1 is a miniature magnetic gun. When optimally tuned, it will propel a small slug about 1.5 metres high, or 2.5 metres horizontally.
IC1 is a 555 timer in astable mode, sending approx. 10 ms pulses to decade counter IC2. IC2 is continually reset through R3, until pin 15 is taken low through the "Fire" button. IC2 then sequences through outputs Q1 to Q7, to feed power transistors TR1 to TR4, which fire electromagnets L1 to L4 in rapid sequence.
Transformer T1 secondary is 18 volts 1 amp A.C. When rectified and smoothed, this provides 25.2 V D.C for electromagnets L1 to L4. Resistor R4 drops 12 V to obtain a supply voltage low enough for IC1 and IC2.
The electromagnets are wound on a 25 cm long, 3 mm dia. copper tube (available at hobby shops). Two "stops" may be cut from tin for each electromagnet, and 500 turns of approx. 30 swg. enamelled copper wire wound between them. The electromagnets should be wound on a base of reversed sellotape, so that one may slide them on the copper tube. The slug (or "bullet") is a 3 cm long piece of 2 mm dia. galvanized wire, which should slide loosely inside the copper tube.
Most crucial to the effectiveness of the gun are the setting of VR1 and the positions of electromagnets L1 to L4 on the copper tube (the values and measurements shown are merely a guide). Firstly, with L2 to L4 disconnected, VR1 should be tuned and L1 positioned for optimum effectiveness (place a wire inside the tube to feel how far the slug jumps with L1). Then L2 (now connected) should be positioned for optimum effectiveness (the slug will now exit the tube). Repeat with L3 and L4.
Electromagnets L2 to L4 were each found to substantially increase the range of the gun. In a forthcoming edition of EPE, the author will describe how readers may land a small projectile on Mars.
author: Rev. Thomas Scarborough.
e-mail:
web site: http://www.electronics-lab.com

0 komentar:
Posting Komentar